Total Diffracted Intensity
Introduction
The Total Diffracted Intensity (TDI) tool is part of the MuscleX suite developed for analyzing X-ray diffraction images of biological samples, such as muscle fibers. In diffraction experiments, total diffraction intensity is a key quantitative measure - it reflects the overall scattering power of the sample, which is proportional to properties like sample mass, density, or structural order.
This tool allows users to:
Define and apply custom masks to isolate regions of interest (e.g., remove background, beamstop artifacts).
Compute and export total and average intensity values from each image in a folder for downstream analysis.
These metrics are valuable for comparing conditions (e.g., relaxed vs. contracted muscle), normalizing datasets, or identifying outliers during high-throughput imaging workflows.
How to Use
Launching the Program
If MuscleX is installed:
musclex tdiFrom source (developer mode):
python3 -m musclex.ui.TotalDisplayIntensity
Required Python packages:
PyQt5,matplotlib,fabio,numpy,pandas.Note that the class
TotalDisplayIntensitywill be renamed in a future release toTotalDiffractedIntensity.
User Interface Overview
Select an Image
Click “Select an Image…” to open a diffraction image (TIFF or HDF5).
The image will appear in grayscale using the default intensity range.
Set Intensity Display Range
Adjust Min intensity and Max intensity values to control the display range.
This helps highlight weaker features or saturate bright spots for better contrast.
Mask the Image
Click “Mask The Image” to launch an interactive masking tool.
You can define regions to exclude from analysis (e.g., noisy borders).
The mask is saved as
tdi_mask.tifand will be applied to all images.
Navigate Images
Use the
<<<and>>>buttons to browse through the images in the same folder.
Process Folder
Click “Process Folder” to compute and export results for all images:
A CSV file is generated containing total and average intensity values.
Results are saved in the
tdi_results/subfolder.
Figure 1. TDI GUI

How It Works
Image and Mask Loading
The program reads the image data using the
fabiolibrary.If a mask is defined, it is applied as a binary filter (
1= valid,0= excluded).
Total Intensity Calculation
total_intensity = np.sum(masked_image)
The image is multiplied by the mask to zero out unwanted pixels.
The pixel values in the valid region are summed to compute Total Intensity.
Average Intensity Calculation
unmasked_pixels = masked_image.size - np.sum(1 - mask)
avg_intensity = total_intensity / unmasked_pixels
The number of valid pixels is determined by subtracting the count of masked pixels.
Average Intensity is then the total intensity divided by the number of unmasked pixels.
Export
Results are saved to
tdi_results/summary.csvwith the following columns:ImageName: image filenameMaskFileName: typicallytdi_mask.tifTotalIntensity: sum of all unmasked pixel valuesAvgIntensity: average value over unmasked pixels
Mask Definition and Usage
Overview
The Mask and Empty Cell Specification window in MuscleX provides a unified interface for defining masks that exclude undesired regions from X-ray diffraction images. It allows manual drawing, intensity-based masking, radial cropping, and subtraction of empty cell (blank) images. These masks ensure cleaner data and more reliable intensity quantification.
Masking Window Features
Feature |
Description |
|---|---|
Select Empty Cell Image(s) |
Load one or more background/blank images to subtract static artifacts like beamstops |
Draw Mask |
Open a drawing interface to manually exclude regions using polygon, rectangle, or brush |
Low Mask Threshold |
Excludes pixels below this intensity (e.g. detector gaps, shadowed areas) |
High Mask Threshold |
Excludes pixels above this intensity (e.g. beam center, saturation artifacts) |
Enable Mask Dilation |
Optional. Expands the mask area around low/high threshold regions using morphological dilation |
Rmin / Rmax |
Masks all pixels outside the selected radial range from the image center |
Subtract Empty Cell Image |
Applies scaled subtraction of selected empty cell image(s) before applying thresholds |
Clamp Negative Values to 0 |
Replaces negative values after subtraction with 0 |
Show Image With Mask |
Dropdown view to preview the mask overlay with current settings applied |
Example Workflow
Start in TDI or other MuscleX tool and click “Mask The Image”.
In the mask window:
Optionally select a blank image for subtraction.
Enable Low and/or High Mask Threshold and set values.
(Optional) Check Enable Mask Dilation for either threshold.
(Optional) Enable Rmin/Rmax and specify radial bounds.
(Optional) Click Draw Mask to manually mask areas.
Use “Show Image With Mask” dropdown to inspect the result.
Click Save to generate and store the combined mask.
Mask Visualizations
Green = Low threshold mask
Blue = High threshold mask
Red = Manually drawn mask
Purple = Rmin/Rmax radial mask
These masks are visually overlaid in the preview window:
Figure 2. Default Mask Window
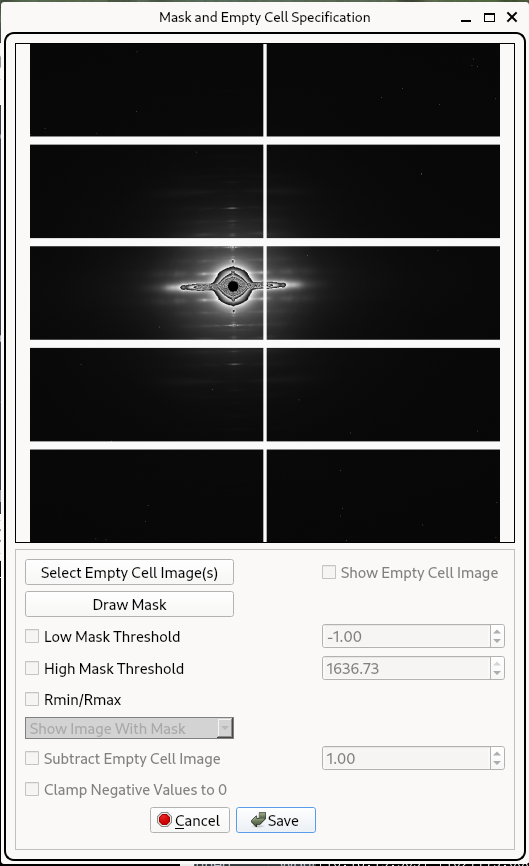
Figure 3. Low and High Threshold Mask with Drawn Region
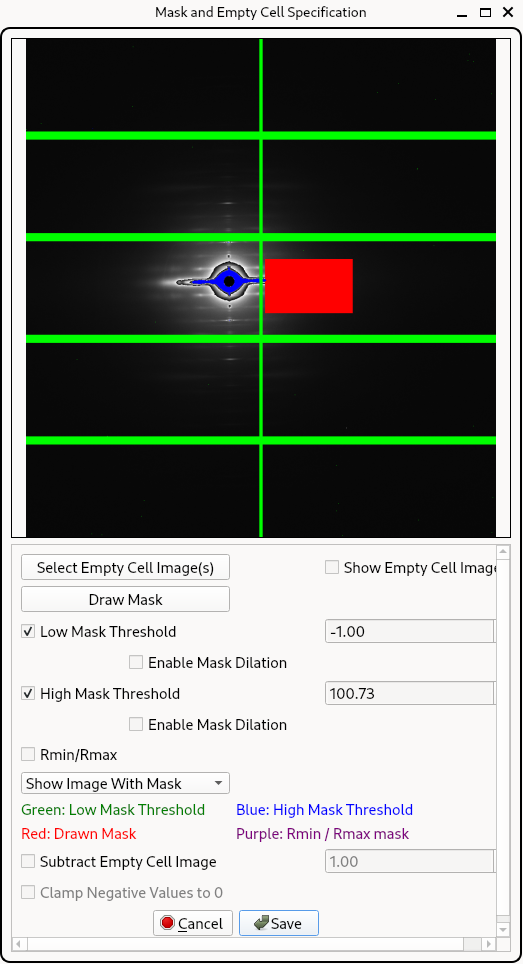
Figure 4. Full Mask: Thresholds, Dilation, Radial Mask
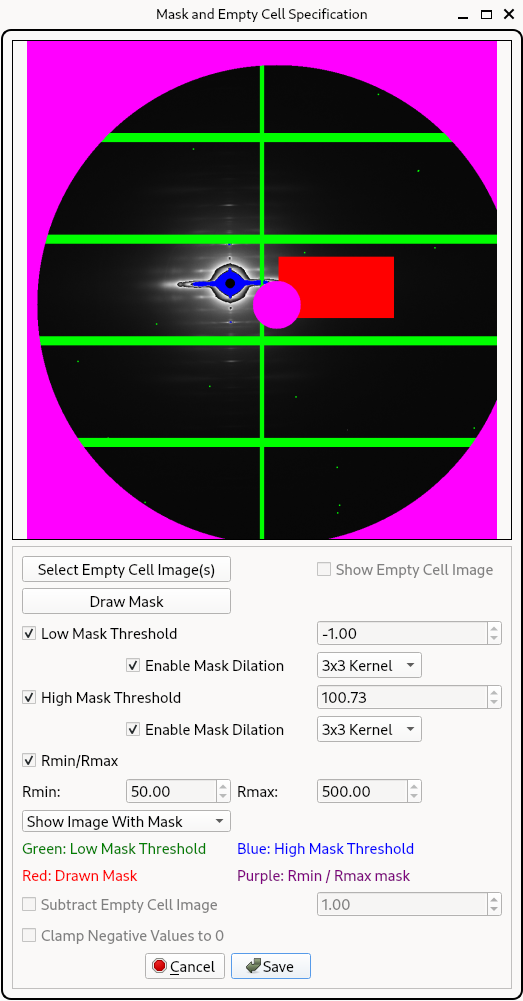
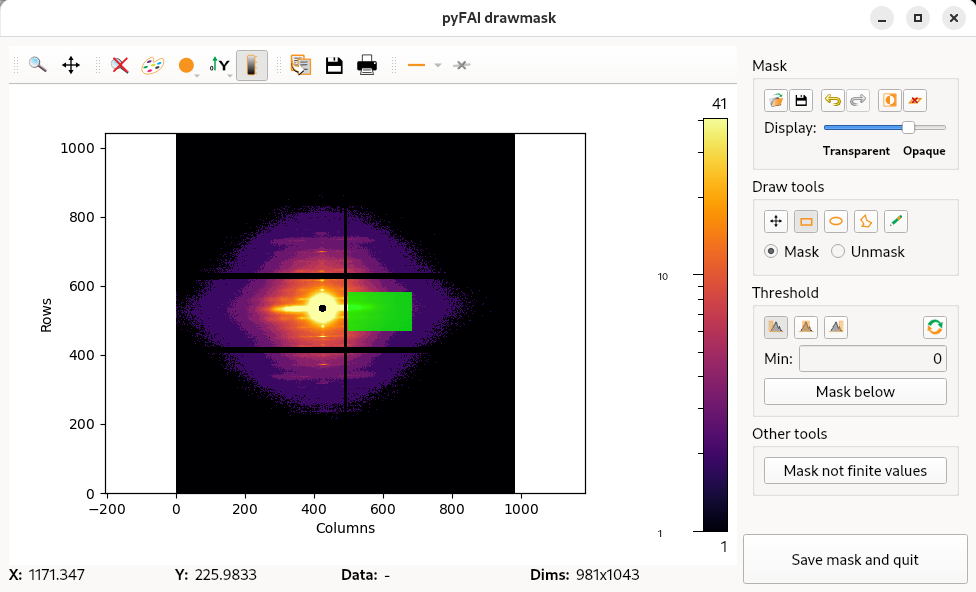
Figure 5. Manual Mask Drawing Interface (pyFAI tool)
How Masks Are Combined
After configuration, the following masks are combined via binary AND:
final_mask =
  manual_mask *
  low_threshold_mask *
  high_threshold_mask *
  low_dilation_mask *
  high_dilation_mask *
  radial_mask *
  blank_subtraction_mask
This mask is then used in downstream image analysis and intensity extraction.
Developer Reference
Component |
File |
Description |
|---|---|---|
TDI integration |
|
|
Masking UI & logic |
|
|
Manual mask drawing interface |
Called via |
|
File handling |
|
|